|
Memberkit has been designed from ground to be highly flexible when it comes to design. It does not have strict default design like many other content management systems and membership software. You will basically have two separate folders on your site when the installation is completed:
1. /members/
2. /memberkit/dev/
Dev folder contains your site templates. Although we call them templates, they are mostly simple HTML files that can be opened in an HTML editor easily. You can add new files to this folder, edit existing files, or just manage it like any other HTML web site. Then simply "Publish" your work on Memberkit Admin Panel and the changes will be live on the /members folder.
Development Strategies:
There are two common approaches to apply your custom design to a Memberkit based site.
You can either use a desktop HTML editor such as DreamWeaver/FrontPage,
or you can just start with the default Memberkit user area design and slowly customize it according to your needs.
Strategy 1. Using a New Design Created on Your Desktop HTML Editor:
This is the most flexible way to create your web site and member area design. Start by designing a website
offline using an HTML editor such as DreamWeaver. Or hire a designer and get her to make a great looking design
for you and ask her to send it to you as HTML pages. You can even buy and use one of the commercial or free design
templates available on the web. Once you have the design ready to be used on the site, you will need a small manual
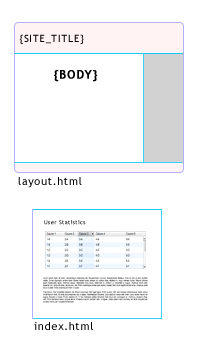
change before uploading it into your site. You will need to insert a {BODY} tag inside the document where you would like the
main body of the web page to show up. Body is the section where your content, forms or listings will be included.
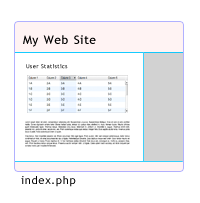
Simply insert a {BODY} string in the middle of the page. Then rename your index file as "layout.html".
Then upload your files to your web site under "dev/layout" folder. That's pretty much all
you need to do to apply your design to the "non-member area" pages.
You can also do something similar for the "member area" pages. Create a copy of the layout page,
if you need changes on the design or navigation, do them and rename it as "loggedin_layout.html"
and upload it into the layout folder as well. Next, click on the "Publish Site" button at the top of the admin panel.
When publish is complete, you will see a "visit site" link to the live folder. Click on that to test your site.
You should be able to see your pages properly. They will not be functional yet but they should look exactly like
the pages you created on your HTML editor.
 |
 |
 |
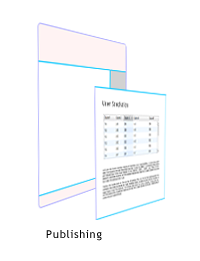
| Dev Site |
Publishing |
Live Site |
| Create your pages and design on the dev folder. Layout pages and regular pages are not integrated at this point. |
Publishing your site will rebuild pages on your live folder. Layouts and pages are merged together and tags are converted into code. |
Layout and pages are integrated on this step. Your fully working site is generated and live. |
Your next step would be to start making your site really work. You will do that by adding links and navigation.
Open your layout pages on the Memberkit admin panel "File Manager" and simply change the links to point to the other pages.
For example, your navigation link to the forum should simply be "../forum/".
You can also make these changes on your local computer if you are more comfortable there. Simply download the "dev" folder
completely to your computer, make changes and upload it back. Here is a list of most commonly used tags. For starters,
in order to allow logins, place " {TEMPLATE:profile/login.html} " into layout.html, and to enable main profile links,
place " {TEMPLATE:profile/memberarea.html} ".
Strategy 2. Starting with the Default User Area Design
Another approach to designing your site and member area would be to start with the default design and apply changes incrementally to it.
This approach is probably easier if you already like the default design of Memberkit User Area and just would like to integrate it with
an existing design. This approach is also easier since you will be making changes incrementally and when things get messed up, you can
simply restore the old file and restart from the last step.
When Memberkit is installed on your site, you will have a working member area and a non-member area. Simply open the layout template
from the "File Manager" panel on the right side and make your changes on it. You can also edit your pages using an offline HTML editor.
Memberkit is designed to allow that. Download "dev" folder from your site and open the pages you would like to change, edit them, save
and upload.
Memberkit is designed to be highly flexible. For example, you can add a new file into your site and upload it under the dev folder,
and when you "Publish" your site, it will also be copied to your live folder. Memberkit can detect links on your pages and convert them
to their correct locations on the live site. So, a good approach to edit your pages might be to simply:
- Download complete "dev" folder into your computer using an FTP client,
- Make your changes on the pages using your favorite editor,
- Upload it back when you are finished,
- Click on the "Publish" button to make them live.
Tags:
design
Related Articles:
 Add a new comment Add a new comment
|
Send Comment